While I didn't succeed in extracting manganese metal, I certainly got my money's worth of fiery, beautiful thermite! After some online research, it appears that battery paste has a lot of carbon, which would definitely hurt a thermite reaction by throwing off the stoichiometry and absorbing heat. In the future, I may try purifying battery paste or I may use pottery manganese dioxide in my thermite. The third time's the charm!
Experiment 46: Manganese Dioxide Thermite
I wanted manganese metal for my element collection, so I tried a thermite reaction to extract it from manganese dioxide. Really, I just like thermite in general, so any oxides I can get my hands on are susceptible to being reduced. :) To get my manganese dioxide, I removed the black electrolyte sludge from alkaline and dry cell batteries. Then, I washed the paste, dried it in the oven, and ball milled it to a fine powder. I mixed this with some of my ball-milled aluminum powder in a 2.42:1 MnO2:Al ratio and placed it in a flowerpot for ignition.
Ignition was accomplished with a magnesium ribbon, and the reaction proceeded, but not as vigorously as I had expected. Whereas the thermite should have burnt itself out in less than 30 seconds, mine took over two minutes to finish. The slag was a crumbly, dirt-like powder, instead of the molten glass and metal that should have appeared. I thought that my aluminum powder wasn't fine enough, so I ran my ball mill for a longer time and tried again, but the thermite still didn't produce any lumps of manganese metal. However, the slag powder stuck to a magnet, which could indicate that it has metallic manganese or a manganese alloy in the slag.
While I didn't succeed in extracting manganese metal, I certainly got my money's worth of fiery, beautiful thermite! After some online research, it appears that battery paste has a lot of carbon, which would definitely hurt a thermite reaction by throwing off the stoichiometry and absorbing heat. In the future, I may try purifying battery paste or I may use pottery manganese dioxide in my thermite. The third time's the charm!
While I didn't succeed in extracting manganese metal, I certainly got my money's worth of fiery, beautiful thermite! After some online research, it appears that battery paste has a lot of carbon, which would definitely hurt a thermite reaction by throwing off the stoichiometry and absorbing heat. In the future, I may try purifying battery paste or I may use pottery manganese dioxide in my thermite. The third time's the charm!
Experiment 45: Lithium Metal from Coin Cells
A very long time ago, in Experiment 2: Lithium Battery, I extracted lithium foil from some old lithium cordless phone batteries. The batteries were constructed similarly to AA batteries, with a cathode and an anode wrapped up in a very tight roll. While fun to play with, the lithium from the batteries oxidized quickly and was really hard to store well. I wanted some shiny lithium and had some "2032" coin cell batteries, so I decided to extract the lithium from them.
 For this experiment, fresh batteries are crucial. If the battery voltage is much less than 3V, the lithium inside will be corroded unrecognizably. I practiced my battery-opening skills on a dead coin cell and used side cutters to twist the cathode rim away from the anode cup. I then pried the anode cup out and removed the paper separator to get to where the lithium would have been had the battery not been dead. When dealing with lithium, speed is important because exposure to moist air will oxidize and darken the lithium, which makes it less appealing than shiny metal.
 Once I practiced my technique, I rapidly disassembled three fresh lithium coin cells and scraped the lithium off of the anode cup into a beaker of mineral oil. I was impressed by the amount of lithium inside such a tiny battery. With the lithium temporarily protected from the atmosphere in the oil, I submerged a small sample vial in the oil and flicked all the bubbles off of its sides. After the vial and its lid were free of air, I coerced all my lithium shavings into entering the container. This was especially tricky because lithium is lighter than oil and wants to float. In the end, however, I got all of the lithium into the vial.

To finish up, I let the lithium react with whatever was in the mineral oil and then carefully tipped the vial just a bit to let the small gas bubble escape. I capped the vial tightly (while still under mineral oil) and then dried it off with a paper towel. Even weeks after the extraction, the lithium metal is still shiny where fresh surfaces were exposed during the scraping. The sample is a nicely dangerous and beautiful addition to my element collection.
 For this experiment, fresh batteries are crucial. If the battery voltage is much less than 3V, the lithium inside will be corroded unrecognizably. I practiced my battery-opening skills on a dead coin cell and used side cutters to twist the cathode rim away from the anode cup. I then pried the anode cup out and removed the paper separator to get to where the lithium would have been had the battery not been dead. When dealing with lithium, speed is important because exposure to moist air will oxidize and darken the lithium, which makes it less appealing than shiny metal.

To finish up, I let the lithium react with whatever was in the mineral oil and then carefully tipped the vial just a bit to let the small gas bubble escape. I capped the vial tightly (while still under mineral oil) and then dried it off with a paper towel. Even weeks after the extraction, the lithium metal is still shiny where fresh surfaces were exposed during the scraping. The sample is a nicely dangerous and beautiful addition to my element collection.
Experiment 44: Nickel Acetate and Nickel Electroplating
 I thought it would be fun to try electroplating with nickel, since nickel has a fancy golden-silvery hue and doesn't tarnish easily. To start, I followed this Instructable to make a dilute solution of nickel acetate. In summary, nickel metal is electrolyzed in a solution of vinegar and salt using 12V. I used two Canadian nickels and my ATX lab power supply's 12V. Some Canadian quarters, dimes, and nickes are pure nickel; check with Wikipedia to see if the coin's year means it is nickel or not. I let my coins dissolve until the solution was a nice bright green color. Once the nickel acetate electroplating bath was done, I moved on to the fun part--electroplating!
To prepare my copper pennies for electroplating, I first dipped them in dilute sulfuric acid and then in a sodium hydroxide solution. The acid removes some surface contaminants and the base removes others. A very clean surface is necessary for a good, solid plating. Once the pennies were clean, I attached them to the negative clip of a 3V AA battery pack. For nickel plating, lower voltages are usually better, and lower amperages also help with smooth finishes. Thus, batteries at low voltage and low current are better than, say, an ATX 12V line. The anode, or positive terminal, of the plating bath was a nickel coin. It is important to note that the anode alligator clip should be above the water line or else it will be corroded away along with the nickel coin.
 With the penny in the solution, I rotated it every thirty seconds to give it an even plating. After about a minute, I moved the battery pack alligator clip to a new position on the coin so that every area was plated. Once I had plated the coin for about three minutes, I washed it off and it was brilliantly shiny!
The coins didn't need any polishing at all, which I thought was really cool--my experiments with zinc plating were never this shiny. When compared with the blue-tinted zinc-plated coins I already had, the nickel-plated ones had a very beautiful golden-silver tint. I also plated steel with success by washing it in the acid and base and then repeating the plating procedure.
After I was done electroplating, I evaporated the nickel acetate plating solution by letting it sit uncovered for a month or so. This made some really nice chips of bright aqua nickel acetate crystals. I also made copper acetate by the same electrolysis method, and that evaporated down into very dark green kite-shaped crystals.

Experiment 43: Isolating Red Phosphorus from Matchbooks
Phosphorus! The word brings to mind war, fire, and Thomas Edison. In all of these cases, phosphorus is memorable for its dangerous properties. Specifically, the allotrope white phosphorus autoignites in air and burns, spraying toxic droplets of white phosphorus everywhere. Its less-dangerous brother, red phosphorus, can be found in nearly every home.
I wanted some phosphorus for my element collection, so I chose red phosphorus over the extremely deadly white phosphorus. Red phosphorus (with crushed glass) is on the dark red striker pads on boxes of matches, so I collected 14 of these and cut off the striker pads. I placed these into acetone to dissolve the glue binding the red phosphorus to the cardboard. This went rather quickly, and after some stirring to dislodge any remaining red phosphorus, I removed each soggy strip of cardboard and washed it with more acetone. This helped catch any remaining red phosphorus and reduce losses. There isn't much red phosphorus on each strip to begin with, so careful handling is critical in this experiment.
After I had collected all the red phosphorus in the acetone, I let the mixture settle and then decanted off most of the acetone. I let the rest evaporate outside. To purify the red phosphorus from the annoying fibers of cardboard in the matted red cake, I poured in some concentrated sulfuric acid and heated the mixture outside on a hotplate. Needless to say, this step is dangerous and personal protective equipment is absolutely necessary. The hot sulfuric acid will release fumes as it chars the paper bits into carbon powder, so be mindful of that if you do this experiment yourself. Additionally, the mixture may "burp" a little, so a watch glass over the beaker might be helpful keeping the acid in the beaker.
 Once I was satisfied that all the paper had been completely destroyed, I let the mix cool and placed the beaker in cold water. Then, I carefully added cold water to the beaker's contents, drop by drop, until I filled it to the top. This must be done slowly, as the dissolution of sulfuric acid into water releases a lot of heat. I let the mixture settle and decanted off the top portion of water. Then, I diluted and decanted the mix six more times so that no sulfuric acid remained in the beaker. Finally, I let the remaining water evaporate and then scraped the purified red phosphorus onto a sheet of paper.
To finish the experiment, I made another glass ampoule (Experiment 28: DIY scientific ampoules) and mushed the rounded base of the test tube into a flat bottom so the ampoule could stand upright. I then carefully tapped the red phosphorus powder into the amoule and sealed it with a torch (I first cleaned all residue off the neck of the ampoule). The resulting red powder is a pretty color and makes a very interesting sample for my collection.
Experiment 42: Extracting Tantalum Metal from Capacitors
After reading some interesting notes on another chemistry blog, I found out that there was solid tantalum metal inside tantalum capacitors. Apparently, tantalum is comparable in price to gold, but I wanted the tantalum for my element collection, not for scrap value. Intrigued, I rummaged through my mountainous stack of scrap circuit boards to find all their tantalum capacitors.
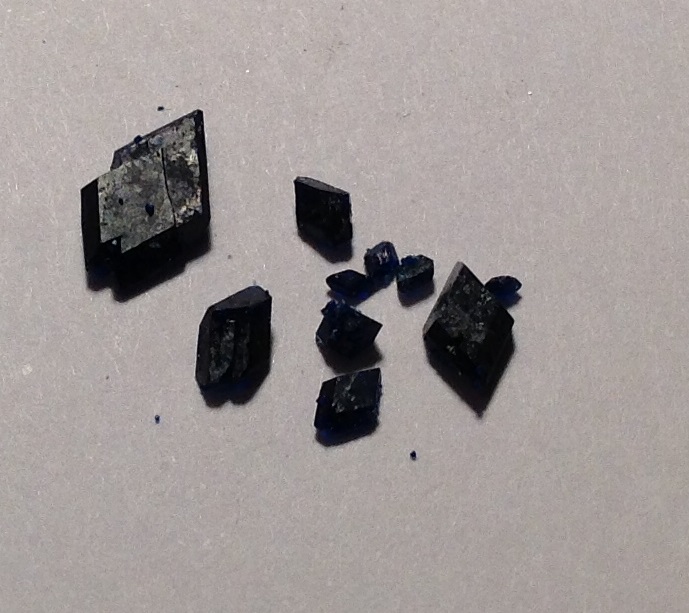
 I found around thirty tantalum caps on different boards and broke them off. They are somewhat distinctive in appearance, but a Google search for "tantalum capacitor" also helped with identification. The tantalum capacitors I got can be seen in the picture on the right.
To extract the tantalum, I used a hammer to lightly tap on the larger capacitors and used pliers to crush the epoxy on the smaller ones. The tantalum inside is a somewhat-fragile sintered block, so don't go crazy wacking them, or they will break. Each tantalum block had a small tantalum wire attached to it, and this wire was attached to the capacitor SMD solder pad. I removed the solder pads from all the blocks I broke out of the epoxy and then placed the tantalum into a test tube for further cleaning. I added sand and water to the test tube and shook it vigorously to abrade off the manganese dioxide electrolyte on the surface of the tantalum.
 Once the tantalum was clean and dry, I ended up with twenty-five miniscule black tantalum blocks with anodized tantalum wires protruding from them. I thought they were pretty neat, since they were quite heavy for their size, owing to tantalums density of ~16g/cc. The wire anodization colors were also interesting and ranged from blue to green. They weighed just about one gram total and made a really fascinating sample for my element collection. Who knew tantalum was in every computer?
Experiment 41: Growing Sulfur Crystals


Then, with my solvent collected, I began the recrystallization. I placed the xylene in a beaker with a stir bar and some impure sulfur and heated it on medium heat on my hotplate. I also had a beaker full of snow water resting on top of the xylene beaker to act as a crude condenser and recover xylene vapors. The whole experiment was done outside. The xylene shouldn't boil, or else vapors will go everywhere and escape the crude condenser setup in large quantities (unhealthy).
With the sulfur dissolving, I placed another beaker with a small amount of xylene (no sulfur) on the hotplate to warm. I also put a third clean beaker on the hotplate with a coffee filter on its top. Just as the xylene began to boil, I poured the prewarmed pure xylene through the filter in the third beaker. This warmed the filter and the beaker to prevent sulfur from crystallizing immediately on contact with the cold surfaces. Then, I filtered the dissolved sulfur mixture through the filter.
 Once it finished filtering, I removed the filter and covered the beaker's mouth with tape to prevent losing xylene vapors. I then wrapped the hot beaker in towels to slow its cooling. This helped the crystals to grow more slowly, which makes bigger crystals. Once it cooled completely, I decanted off the xylene (which still had some dissolved sulfur in it) and scraped the sulfur crystals onto a coffee filter to dry. After the first batch was dry, I tried using them as seed crystals for a second and third batch of crystals, which seemed to make larger, prettier crystals. The resulting pure, shiny piles of sulfur crystals were quite beautiful.
Subscribe to:
Posts (Atom)