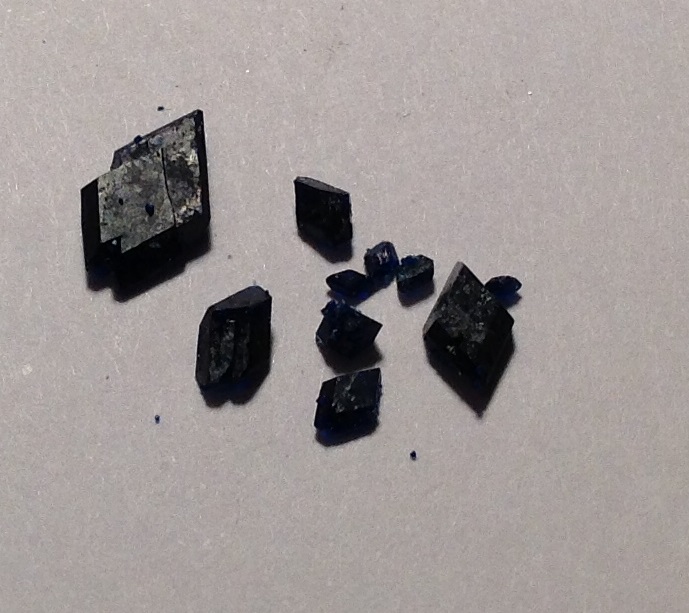
Encouraged by the success of my copper crystal growing experiment, I planned another metal crystal experiment - tin! There are actually plenty of videos on growing tin crystals, but they all make terribly unsatisfactory small, flimsy crystals that can't even support their own weight out of water. Using the same method I used for growing large, solid copper crystals, I successfully did the same for tin.
For this experiment, I initially used tin II chloride (about 90 grams per liter) acidified with a bit of HCl as the electrolyte. A blob of tin and a strip of tin functioned as the anode and cathode, respectively. As in my copper crystal experiment, the anode was on the bottom of my glass jar cell while the cathode poked into the electrolyte from the top.
The same sort of LM317 adjustable voltage regulator circuit was used, including the string of six diodes on the output. Each diode drops a certain amount of voltage, so with a series of diodes, the lowest achievable voltage drops from the LM317's 1.25V down to about 0.25V. This is critical for getting very low currents and slow crystal growth, which lead larger, more solid crystals.
I kept a thorough log of my observations during the experiment in a lab notebook, and the text of this may be viewed here. The first try at growing the crystal worked fairly well, producing a solid result with some shiny crystal faces. I couldn't really get the current to below 10mA or else it would drop almost discontinuously to 5mA. I tried running the cell at 5mA, but I don't think tin was actually depositing. A weird grey gunk started to grow at the cathode, and this turned out to be very brittle and crumbly out of water. Upping the voltage just slightly to get ~10mA fixed the problem and tin crystals started growing again. I also had to swirl the solution around a few times, and I think that this caused debris from the anode to get kicked up, which could have caused more small crystals to form, which is undesirable. There was also some cloudiness at the end of this run, which may have been SnCl2 hydrolyzing in a not-acidic-enough electrolyte. This should be avoided for best results.
To improve the experiment, I grabbed a small DC motor (probably scavenged from some dead electronics) and made a stir stick using an old plastic tube from a pen. I powered the motor with another LM317 circuit so that I could get the lowest RPM. This functioned as a very gentle agitator for the electrolyte cell to ensure the concentrations of tin chloride remained well-mixed. Otherwise, the denser, more concentrated SnCl2 coming off the anode would stay at the bottom while the cathode would deplete the upper part of the cell of its SnCl2. This seemed to work OK. The resulting crystal did not have any grey gunk, but many of its crystals were smaller, though very solid. There may have been more HCl in the solution than with the previous run; I had to re-acidify it to dissolve the cloudiness observed after the first run.
One interesting thing I noticed is that the tin anode made crackling noises as it cooled from being cast, and after using it as an anode, electrochemical etching showed some really neat crystals inside.
I wonder if more metals would do this.
Still not quite satisfied with the crystals, I removed 30mL of the electrolyte from my cell (a tall glass baby food jar with a ~140mL capacity) and replaced it with tap water and a few drops of HCl (to ensure the solution stayed clear) for a new concentration of about 60g/L. I used the same stirring technique as before, but this time, the crystal grew extremely quickly, taking less than 48 hours to grow to the bottom of the cell. It also formed absolutely enormous crystal faces, with unblemished, flat, shiny parts a few centimeters long. Through all three crystal growing runs, the current stayed below 15mA and the voltage was (according to the voltmeter) between 40 and 150 millivolts. Thus, it seems that low current along with low(er) Sn2+ and HCl concentration is key to growing large crystals.
Once again, a microwave turntable motor was used for making 360° video of the crystals. Unlike the copper crystals, these tin crystals do not tarnish, so they will retain their awesome shininess indefinitely. :) Perhaps it is time to try some new metals for crystal growing...
Disclaimer: I was in no way compensated for this review, other than MEL Science generously sending me two free chemistry experiment kits along with their starter kit.
With the disclaimer out of the way, let's begin the review! The basic concept is that upon subscription to MEL Science, they send you two chemistry kits each month. You can then do experiments at home without needing to buy everything individually.
My first impression was that everything in the kit was well packed. I did not find anything broken or damaged, and all the glassware was neatly padded so as to make breaking nearly impossible. The starter kit has some good beginning materials - disposable plastic beakers (no more beaker-scrubbing!), a solid fuel stove, some glassware, etc. It also has an instruction booklet on using the kits along with a detailed website that discusses the chemistry going on behind the scenes in the experiments.
The experiments themselves are on a variety of topics - I was sent one on combustion (The Chemistry of Monsters) and one on electrochemistry/redox reactions (Tin). I enjoyed that the kits didn't require a lot of set-up work. There wasn't anything to weigh out, plug in, or lay out. In perhaps five minutes' time, I was doing actual experiments.
The tin dendrites experiment seemed to work well. The dendrites grew beautifully, and the included macro lens took some stunning shots with my iPad 4 (sadly the MEL Science app does not support the iPad 4).
I tried one other experiment for the video, the sugar snake experiment from The Chemistry of Monsters. As seen in the video, the hexamine solid fuel didn't quite fill the included mold, so its depression didn't hold all the sugar/sodium bicarbonate mix and the snake didn't work as well as pictured on the MEL website. That was a small disappointment, but the sugar snake was still quite an intriguing experiment. This simply shows that you may get different results as you try the experiments
In general, the MEL Science experiments seem to be "real"/unadulterated chemistry - they do dangerous and unique things like lighting off a Zn/S mixture and also have complicated concepts such as concentration cells. They are meant to be suitable for most ages, so they won't be a substitute for a rigorous class in chemistry. If, however, you are looking to explore, enjoy, and learn some unique chemistry, a subscription to MEL Science may be what you're looking for.
A while ago, in Experiment 46: Manganese Dioxide Thermite, I attempted to make manganese metal for my element collection using thermite with manganese dioxide scavenged from batteries. The experiment failed. The batteries simply have too many contaminants (carbon, zinc oxide, etc.) to sustain a thermite reaction.
After reading some posts on ScienceMadness.org, I determined which steps would need to be taken to purify the manganese dioxide. I first washed the manganese-containing battery paste with water and vinegar, then dissolved everything in HCl. I filtered off my now-MnCl2 solution from the carbon, but it was contaminated with iron. NurdRage's selective precipitation procedure came in handy for resolving that issue, and finally, I got a pretty pink solution - pure MnCl2!
I added NaOH to that solution to make manganese hydroxide, which oxidizes rapidly in air to Mn2O3, an oxide suitable for thermite. After baking my hydroxide slush in the oven to help along the oxidation, I mixed my Mn2O3 with aluminum powder and lit it using a magnesium ribbon. Unlike my previous manganese thermite attempts, this one violently flared up and reacted quite vigorously.
Even better, I recovered some very beautiful shiny lumps of manganese metal. While the thermite only gave a 23% yield on account of being so violent, it added another element to my collection, which is something to celebrate for sure.
A while ago, I saw a neat YouTube video on making napalm from Styrofoam and gasoline. Making napalm is as easy as pushing Styrofoam into gasoline until it won't dissolve anymore. I waited until I got a large block of Styrofoam from an appliance box and then tried making napalm in my own backyard. :)
The Styrofoam dissolved surprisingly quickly, and it tripled the volume of the gasoline. I only used about 10mL of gasoline, but that was plenty to make a good volume of napalm. It had a consistency like silly putty, and it was very stretchy. While saturated with gasoline, the napalm was slippery, but when it dried just a bit, it became tenaciously sticky.
I split my napalm into three blobs and lit one on an overturned paint can. For its villainous reputation, napalm really isn't that interesting. It just burns... and burns and burns and burns. Each small chunk of napalm burned for over four minutes.
While the napalm itself wasn't super exciting, it did provide a neat photo opportunity. I used my Nikon 1 J1 in manual mode to capture some really neat images of the flames. The photos were all underexposed slightly to make the fire stand out, and I used a fast shutter speed to ensure sharp detail in the flames and toxic black smoke. I took a lot of pictures as the napalm burned and then picked the best ones; at times, the flames had very beautiful contours. Although napalm may be unexciting as far as fireballs go, it certainly provides a good subject for the amateur photographer.
For a while, I have wanted to make flash powder, a mixture of potassium chlorate or perchlorate and aluminum powder. Like nitrocellulose, it burns with a flash when unconfined, but it will explode if confined. One easy (if expensive and time-consuming) way to get potassium chlorate is through purification from match heads, so I decided to try the process on a handful of matches. I used this video as a reference for the experiment.
I began the experiment by crushing around 50 match heads into a powder. For cardboard matches, I simply snipped the head off and then pulverized it, but for wooden kitchen matches, I crushed the powder off the match and discarded the matchstick. Once I had a fine powder, I poured in about 100mL of water and stirred to thoroughly dissolve the potassium chlorate.
There were a lot of bits of floating cardboard, so I filtered the mixture through a coffee filter to separate the green-colored solution from the insolubles. I also washed the cardboard with water to recover any soaked-up chlorate solution. Then, I boiled the green liquid down to about 1/10 of its original volume and set the beaker aside to cool. When it had cooled to room temperature, I placed it in an ice bath to precipitate as much chlorate as possible. As the solution cools from boiling to freezing temperatures, the potassium chlorate's solubility drops, so it precipitates as solid crystals.
I filtered off my crystals using another coffee filter and then washed these with acetone to remove some of the green dye; obviously, I didn't get all of it. Potassium chlorate is not soluble in acetone, so this step does not remove any potassium chlorate. Then, I let my crystals dry and weighed them. From around 50 matches, I got 1.5g of fairly pure potassium chlorate. Combined with aluminum powder, this is sure to make a brilliant flash.
Copper thermite is notorious for being violent and even explosive, so naturally, it was next on my list of thermites to try. I began by weighing my 49.25g of copper (II) oxide made in Experiment 54: Making Copper Oxide for Thermite. I divided this mass by 4.42 (derived from stoichiometry) to get the required mass of homemade aluminum powder, which was 11.12g. I mixed them thoroughly to ensure a fast reaction and then set aside 45g for later. With the 15g I now had, I used a homemade electric match (wire filament + kitchen match) to ignite it with the press of a button. I wanted to capture the reaction on slow-motion, but my Nikon 1 J1 only records slow-motion for five seconds, so I had to have the thermite ignite at a precise time. The electric match was better for this than a magnesium ribbon.
I was quite impressed by the speed and violence of the reaction. It was all over in less than a fifth of a second, and the cloud of smoke it created made a smoke ring at least a yard in diameter. It was quite amazing to see.
I wanted to make molten copper with the rest of the thermite. Since my unmodified copper thermite blew everything out of the paper cup I put it in, I diluted my copper thermite with 17g of borax powder in a 2.5:1 ratio. In a previous small-scale test, the borax had slowed the reaction and acted as a flux to liquefy the alumina slag created by the thermite. This helped separate the molten copper from the slag. Since this thermite reacted more slowly, I ignited my large batch of it using a magnesium ribbon. It started off well, but then the thermite fizzled and continued to sputter for a few minutes. Since my small-scale test of the composition worked well, I think that the large batch didn't perform because I had lightly pressed the thermite down before igniting it. Maybe this didn't let the fire travel quickly enough.
Although the slow thermite was a bit of a disappointment, it did make solid copper pebbles, which is more or less what I was aiming for. I used a hammer to pulverize the slag and then washed the mix with water to float away the less-dense slag. This actually separated the copper out quite well, and in the end, I recovered 3.55g of copper granules. This is a 9% yield, which isn't terrible, considering the thermite seemed to sputter instead of flaring up nicely. In any case, my expectations were "blown away" by the fast copper thermite smoke ring, so I consider this experiment a success.
A very long time ago, I received some scrap rods of titanium. One of titanium's really neat properties (it has several) is that it can be anodized into a rainbow of colors. Unlike aluminum anodizing, where the created aluminum oxide layer is colorless and a dye is needed, titanium anodizes to create what is known as thin film interference. Basically, light waves entering the transparent oxide layer created by anodizing interfere with each other, making new waves and colors. Other metals like niobium and tantalum also have this effect. I thought anodizing titanium looked really fun, so I slapped together an anodizing experiment.
For my anodizing bath, I used 200mL of tap water with 8 grams of Borax dissolved in it. Then, I sanded my titanium and cleaned it with acetone. It is important to not leave fingerprints on the surface.
I looked at this image to see which voltages anodized titanium to nice colors. Then, I connected the number of 9V batteries necessary to achieve that voltage. Some batteries were at a bit less than 9V, so my first voltage I used was 24V (three batteries). I connected my titanium to the positive on my battery series and clipped a piece of aluminum to the negative. After putting both electrodes in my anodizing bath for half a minute, the titanium had turned a bright blue color!
I wanted to try making a pattern, so I cleaned my blue titanium with acetone again and then cut a tiny square of electrical tape into the letters "Ti." I carefully applied the tape letters to the titanium, being sure not to leave skin oil on the metal. Then, I put the titanium back into the bath, this time using 57V (seven batteries). I wasn't happy with the faint yellow color that voltage made, so I tried again with 73V (nine batteries). That gave a nice pink color, so I took the titanium out and removed the tape. The pattern had worked, and I now had beautiful blue letters on a pink background. The experiment only took half an hour, but it had great results!
After seeing a neat YouTube video (everything starts this way, doesn't it?) showing a chemist removing the copper plating from a zinc-core penny to make a solid zinc penny, I decided to try the experiment myself. Upon further research, I saw that Theodore Gray the element collector also had a solid zinc penny, but he had used cyanide to remove the copper plating. Since I didn't feel like exposing myself to extremely toxic salts, I decided to go with the YouTube method.
The reaction uses calcium hydroxide and elemental sulfur to oxidize away the penny's copper plating but not the underlying zinc. If I remember correctly (I did this experiment some time ago), the reaction smells awful, so it is best performed outside. I didn't have any calcium hydroxide, so I substituted in sodium hydroxide drain cleaner and used gardening sulfur as my source of sulfur. After that, I simply followed the video's directions.
The pennies come out of the solution blackened with copper oxide, so I tried to remove it with a scrubbing pad. That got rid of the copper oxide, but it also scratched the zinc pennies, making them less shiny than they otherwise might have been. I would recommend going with the YouTube video's recommended cleaning method using ceramic cooktop cleaner. I suppose the dullness could also be because of my substitutions, but the reaction still worked well using sodium hydroxide, so I doubt that was the case. Nonetheless, I was really impressed that a reaction could remove only the copper on a penny while leaving the zinc untouched. After polishing the pennies with a Dremel wheel, I was left with ten solid zinc pennies.
Platings provide opportunities to observe the subtle differences in colors of transition metals. While nearly all transition metals are some color of gray, some have different hues. I had some pennies with a layer of zinc or nickel plated over the copper, so I put them together with the solid zinc penny for a nice comparison. Nickel definitely has a golden hue compared to zinc, which I find interesting.
I had an old (possibly from the 1960s) Hoover vacuum cleaner motor lying around, so I decided to turn it onto a lab centrifuge for chemistry experiments. The motor was enormous and spun with such ferocity that I thought it would might go airborne and kill me, which scared me thoroughly. For that reason, I used large bolts to attach it to a thick plastic/wood board, which I clamp to a table when I use the centrifuge.
The vacuum cleaner creates suction by spinning a cast aluminum turbine. The aluminum turbine blades were relatively flat on top, so I decided to make this the centrifuge top. I cut some plywood into a disc with a hole it in to go around the motor output shaft. If the disc ever flew off in operation, someone could get seriously hurt, so I cut some scrap sheet steel into a large washer to go between the end nut of the motor output shaft and the plywood. Once everything was assembled, I tightened the nut until everything was snugly in place.
Previously, I had requested and received free samples of 2mL plastic centrifuge tubes from a laboratory supply company, so I designed my tube holders around those. I cut and drilled six wood cubes with holes sized for my centrifuge tubes and then glued these around the plywood disc. Centrifuges can self-destruct if they are off-balance, so I carefully measured 60° increments around the circle so that the disc would be balanced. To finish off the centrifuge, I added a cord and on/off switch salvaged from the old vacuum cleaner.
For being made from a vacuum cleaner, this centrifuge works surprisingly well. I have successfully separated oil from mayonnaise, although mustard does not separate. This centrifuge is extremely useful for settling precipitates out of solutions. If I mix copper sulfate and sodium carbonate solutions, I get clear sodium sulfate in solution and blue copper carbonate precipitate. By placing a sample of solution in the centrifuge, I can settle all the blue precipitate out and see the true color of the solution--it should be clear if I have used enough sodium carbonate. One thing this centrifuge can't do is enrich uranium, but if that's the only complaint, I would say it works pretty well!
Next on my list of thermite reactions I want to try is copper. For that, I will need copper (II) oxide to react with my homemade ball-milled aluminum powder. I saw a nice video by zhmapper on YouTube about making copper (II) oxide, so I decided to try his method myself.
To start, I made concentrated solutions of copper sulfate (root killer) and sodium carbonate (washing soda). I used about a 2:1 mass ratio of these solids and completely dissolved each. Baking soda (sodium hydrogen carbonate) would work just as well, but the ratio might be different. With my solutions prepared, I mixed them thoroughly together. This made a lot of bubbles, so I had to quickly transfer my experiment to a larger container. When the solutions mix, they make copper carbonate, which can be decomposed into copper (II) oxide. I knew that I had added enough sodium carbonate because the blue color of the solution became clear (once the blue copper carbonate had settled out).
The byproduct of the reaction is sodium sulfate, so I filtered this off, along with the excess water, using simple coffee filters. When the copper carbonate dried, I was left with a robin's-egg-blue powder. To transform the copper carbonate into copper (II) oxide by releasing CO2 gas, I heated the powder in a soup can. My hot plate wasn't hot enough, so I put the can in a bonfire for 15 minutes. When everything had cooled, I was left with a dark black powder--the copper (II) oxide. I also noticed some pink inside the can, so I wonder if the fire was somehow reducing some of the copper oxide back into copper metal.
Untouched, the copper oxide would probably work. I have heard that copper thermite is very energetic, so it probably doesn't require extra fine ingredients. However, I want the best performance from this reaction, so I milled the powder by hand using some steel ball bearings in a plastic jar. Shaken enough, the bearings break up any clumps. I also ran a magnet in a plastic bag over the powder to remove magnetic particles that came from the soup can. I was left with 55 grams of fine copper (II) oxide powder for an exciting thermite reaction.
For a very long time, I have been fascinated with crystals of pure metals. Many people have grown crystals of copper sulfate, but crystals of metallic copper are a rare thing. After seeing The Backyard Scientist's video as well as this more crystalline crystal, I had to try it myself.
The basic principle of copper crystal growing is to very slowly electrolyze a solution of copper sulfate with two copper electrodes. I used a normal copper wire as my cathode (-) and a flat spiral of thick copper wire as my anode (+). The cathode just poked into the solution ~5mm, and the anode rested on the bottom of my glass jar electrolysis cell, connected to my breadboard via a soldered-on insulated wire. In a Sciencemadness forum post, The Backyard Scientist says he used 100g/L copper sulfate and 60ppm chloride ions to prevent spindly dendrites from forming (thick crystals are more impressive). I initially thought dilute copper sulfate would conduct less electricity and thus grow the crystals more slowly, thus helping to form larger crystals. It turns out that if the solution is too dilute, the growing crystal will "use up" all the Cu2+ ions in the immediate vicinity and will get weird polyp-like black growths instead of shiny crystalline copper. I ended up using 40g/L of copper sulfate for the final iteration of my experiment; concentrated solutions (or frequent stirring) are key to success. My chloride ion source was simply table salt, and I used tap water for my electrolyte bath. There was some gunk in the root killer copper sulfate, so I filtered my solution before use.
While a dilute solution is actually not good for making beautiful crystals, very low currents and voltages are. My electrodes were spaced about 7cm apart, and my voltage varied throughout the experiment‐it was usually around 0.28V. The key is to keep the current very low. I never let the current exceed 10mA for the entire experiment. To achieve the very low voltages necessary for low currents, I made an LM317 constant voltage circuit and put five 1N4007 diodes in series on the positive output of the circuit to drop the voltage down lower. Basically, the LM317 can only regulate down to an output voltage of 1.25V, but I wanted the ability to go to around 0.25V, so I put a bunch of diodes on the output so that each of them dropped the voltage down a little bit.constant voltage circuit. Oh well!
Turning the potentiometer on the circuit still changes the voltage, only everything is shifted down a volt. I used a 7.5V wall wart power supply to power the LM317; anything within the specified input voltage will do fine. One odd thing I noticed was that while reading the voltage between the two electrodes, if I connected the ammeter, the measured voltage would increase. I have no idea why this happened, since my circuit should have been a
With everything connected and my electrolyte prepared (filled to ~1/2" of top of glass jar), I turned on the power and adjusted the potentiometer until my multimeter read less than 10mA on the output. I recorded the voltage and nearly everything I did in an experiment log which may be viewed here. If you would like to repeat this experiment, definitely read it through. With my electrolysis power on, I just had to wait. Every few days, I checked on the experiment. At times, I had to gently swirl the solution to mix the Cu2+ ions up again. When I swirled the solution, the current would increase and the voltage would decrease. I could tell when the solution was becoming depleted around the crystal because it would be a lighter blue than the rest of my electrolysis cell. I also covered the jar to prevent dust from entering and added water to balance evaporation. After waiting for six weeks (yes, 42 days), I pulled out an unbelievably shiny bloom of huge copper crystals!
Over six weeks, my crystal grew to 14 grams and a nick in the anode wire insulation allowed the wire to corrode almost through. In a previous run of this experiment, I had noticed that the crystal dulled and darkened after exposure to air. I wanted to preserve the extremely shiny pink color of my new crystal, so I cut the cathode wire ~1/2" from the crystal and hot-glued this to the inside of a small spice jar lid. One note on cutting thick wire with side cutters-be careful to hold the crystal at all times! My first crystal shot a yard away and smashed against the wall when the cutters made it through the wire. My new crystal had already darkened some, so I dipped it in plain vinegar, which restored its ultra-shiny pink color well. I then filled the spice jar with mineral oil and sealed the crystal in to keep its shine.
For photography, I brought the crystal display outside for the bright sunlight and set it on a microwave turntable motor connected to 120VAC. The motor was an AC motor rated for 3rpm, so it slowly rotated the crystal for the video. The effect was rather nice, and I was exuberantly happy to be the new owner of such a rare and amazingly beautiful crystal.
Nitrocellulose is simply cotton that has had its hydroxide groups replaced with nitrate groups. This simple substitution makes it highly flammable and even explosive. After seeing some YouTube videos demonstrating its highly combustible properties, I decided to make some.
First, I selected some 100% cotton string, a piece of white paper towel, and some cotton balls as my sources of cellulose. I very carefully made a 2:1 volume mixture of concentrated sulfuric and nitric acid in a small glass beaker. After stirring gently, I placed this beaker in a bucket of snow to cool the nitration. I nitrated my three sources of cotton separately, one after the other. To nitrate each batch, I placed it in the acid mixture for 15 minutes. After the time was up, I transferred the now-nitrocellulose to a saturated baking soda solution to neutralize remaining acid. Finally, I thoroughly washed the nitrocellulose with plain water and let it dry.
One interesting thing I noticed was that the cotton balls almost seemed to freeze in the mixture. It was quite cold when I did the experiment, but the stiffening could also have been caused by close packing. I had just enough acid to cover three cotton balls at a time, so they were squished.
The homemade nitrocellulose is quite inflammable. I have even held pieces in my hand and lit them without hurting myself. While the paper towel and the cotton seem to burn extremely quickly without any residue, the string burns slower and leaves some charred material behind. A cotton ball that I nitrated at the end of the run also left some residue--perhaps the acid was nearly used up. The best cotton burns so quickly that it can detonate under the right conditions.
I created these "right conditions" by compressing the nitrated cotton balls in a spent brass shell casing and initiating detonation with a homemade bridgewire detonator. I first made an insulating sleeve out of a straw to go on the inside of the shell; this protected the bridgewire from shorting on the casing. Then, I packed the shell half full with nitrocellulose. I inserted the bridgewire (also stuffed with nitrocellulose) and then packed the shell the rest of the way. I left 3/8" at the top and crimped this over with some pliers to seal the shell, creating containment for the combustion gasses.
I put the device in a cardboard box with a polycarbonate viewing window and set it off from another room using my flash capacitor bank. I was wearing hearing protection (a must for explosions), but from family member accounts, the ensuing explosion was frighteningly loud. The shell casing was completely blown to pieces, with brass shrapnel flying through the cardboard box and also embedding itself a centimeter into a nearby block of wood. I was quite impressed by the detonation-it was much more powerful than I had expected.
If you read the preceding two paragraphs, please don't do anything stupid. While exploding bridgewire detonators are incredibly safe (as they contain no primary explosives), shrapnel is much more dangerous than a simple fireball. If you repeat this experiment, make sure you will be protected from potential shrapnel.
A thermite is always a special reaction to perform for a 50th experiment! I enjoy isolating elements at home for my periodic table collection, so I used silicon dioxide (common name: sand) and homemade ball-milled aluminum powder to make small beads of pure silicon.
Iron thermite uses aluminum powder and iron oxide, but silicon thermite needs an additional ingredient besides silicon dioxide to be successful. Adding sulfur creates more heat in a side reaction with aluminum, thus helping the reaction keep going. I used a 12:10:9 mass ratio of S:SiO2:Al. All the materials were finely powdered, and the silicon dioxide came as 400 mesh chromatography media from some company online. They had a free samples program, so I readily agreed to get free chemicals!
After mixing the ingredients, I placed them in a flowerpot and lit them with a magnesium ribbon fuse. The reaction was extremely bright and wonderful, but I'll let the video speak for itself:
As seen in the video, the reaction also makes aluminum sulfide, which hydrolyzes in water to make toxic, smelly hydrogen sulfide gas. This is the active ingredient in many stink bombs, so it really stinks! Plan on taking a shower and washing your clothes before social interactions if you repeat this experiment.
When the reaction had cooled, I put the slag pieces in water and hydrolyzed off all the aluminum sulfide. I then sifted the silicon beads out from the resulting aluminum oxide powder. I may have lost some, but I still got a decent number of small beads of silicon. They weren't very shiny, so I soaked them in dilute hydrochloric acid for an hour or so until I could see the pretty crystals inside. They turned out quite nicely, and I was happy to isolate another element in my backyard!
After seeing a really neat video by Ben Krasnow on YouTube about decapping integrated circuits to reveal the tiny silicon chips inside, I was intrigued. By dissolving away the black epoxy surrounding the chip innards, Ben Krasnow uncovered the silicon wafer square that actually holds all the circuitry for the IC. I thought this was pretty cool, and since I had nitric acid, I decided to give it a shot.
I started by sanding down the metal pins and most of the epoxy. This made it so the nitric acid would have less material to dissolve, so I wouldn't need as much acid. Once I had my chips prepared, I put them in a glass beaker on my hotplate. With the chips on medium heat, I slowly dripped nitric acid onto the black epoxy. It is absolutely critical to add the nitric acid extremely slowly! If it is added too quickly, there will be billowing clouds of nitrogen dioxide, which has an awful odor. Additionally, adding the acid too quickly can cause thermal shock on the hot beaker, which may make it crack (personal experience).
The experiment used substantially more nitric acid than I expected, but after a while of slowly dripping the acid onto the epoxy and regulating the heat to prevent excess boiling, I saw what looked like a silicon chip. The epoxy hadn't actually dissolved, though. It had disintegrated into a thick black paste, which made finding the extremely small silicon chips difficult. I let the beaker cool and then poured everything into water to dilute any remaining acid. From two ICs, I got three silicon chips. I cleaned them with acetone and then put them on a slide for inspection.
I was shocked by how much detail fit onto a chip only a few millimeters square. All these pictures were taken by simply lining my Nikon J1 up with my microscope eyepiece. The results were pretty impressive (the text is even readable at the top of the left picture):
I wanted manganese metal for my element collection, so I tried a thermite reaction to extract it from manganese dioxide. Really, I just like thermite in general, so any oxides I can get my hands on are susceptible to being reduced. :) To get my manganese dioxide, I removed the black electrolyte sludge from alkaline and dry cell batteries. Then, I washed the paste, dried it in the oven, and ball milled it to a fine powder. I mixed this with some of my ball-milled aluminum powder in a 2.42:1 MnO2:Al ratio and placed it in a flowerpot for ignition.
Ignition was accomplished with a magnesium ribbon, and the reaction proceeded, but not as vigorously as I had expected. Whereas the thermite should have burnt itself out in less than 30 seconds, mine took over two minutes to finish. The slag was a crumbly, dirt-like powder, instead of the molten glass and metal that should have appeared. I thought that my aluminum powder wasn't fine enough, so I ran my ball mill for a longer time and tried again, but the thermite still didn't produce any lumps of manganese metal. However, the slag powder stuck to a magnet, which could indicate that it has metallic manganese or a manganese alloy in the slag.
While I didn't succeed in extracting manganese metal, I certainly got my money's worth of fiery, beautiful thermite! After some online research, it appears that battery paste has a lot of carbon, which would definitely hurt a thermite reaction by throwing off the stoichiometry and absorbing heat. In the future, I may try purifying battery paste or I may use pottery manganese dioxide in my thermite. The third time's the charm!
A very long time ago, in Experiment 2: Lithium Battery, I extracted lithium foil from some old lithium cordless phone batteries. The batteries were constructed similarly to AA batteries, with a cathode and an anode wrapped up in a very tight roll. While fun to play with, the lithium from the batteries oxidized quickly and was really hard to store well. I wanted some shiny lithium and had some "2032" coin cell batteries, so I decided to extract the lithium from them.
For this experiment, fresh batteries are crucial. If the battery voltage is much less than 3V, the lithium inside will be corroded unrecognizably. I practiced my battery-opening skills on a dead coin cell and used side cutters to twist the cathode rim away from the anode cup. I then pried the anode cup out and removed the paper separator to get to where the lithium would have been had the battery not been dead. When dealing with lithium, speed is important because exposure to moist air will oxidize and darken the lithium, which makes it less appealing than shiny metal.
Once I practiced my technique, I rapidly disassembled three fresh lithium coin cells and scraped the lithium off of the anode cup into a beaker of mineral oil. I was impressed by the amount of lithium inside such a tiny battery. With the lithium temporarily protected from the atmosphere in the oil, I submerged a small sample vial in the oil and flicked all the bubbles off of its sides. After the vial and its lid were free of air, I coerced all my lithium shavings into entering the container. This was especially tricky because lithium is lighter than oil and wants to float. In the end, however, I got all of the lithium into the vial.
To finish up, I let the lithium react with whatever was in the mineral oil and then carefully tipped the vial just a bit to let the small gas bubble escape. I capped the vial tightly (while still under mineral oil) and then dried it off with a paper towel. Even weeks after the extraction, the lithium metal is still shiny where fresh surfaces were exposed during the scraping. The sample is a nicely dangerous and beautiful addition to my element collection.
I thought it would be fun to try electroplating with nickel, since nickel has a fancy golden-silvery hue and doesn't tarnish easily. To start, I followed this Instructable to make a dilute solution of nickel acetate. In summary, nickel metal is electrolyzed in a solution of vinegar and salt using 12V. I used two Canadian nickels and my ATX lab power supply's 12V. Some Canadian quarters, dimes, and nickes are pure nickel; check with Wikipedia to see if the coin's year means it is nickel or not. I let my coins dissolve until the solution was a nice bright green color. Once the nickel acetate electroplating bath was done, I moved on to the fun part--electroplating!
To prepare my copper pennies for electroplating, I first dipped them in dilute sulfuric acid and then in a sodium hydroxide solution. The acid removes some surface contaminants and the base removes others. A very clean surface is necessary for a good, solid plating. Once the pennies were clean, I attached them to the negative clip of a 3V AA battery pack. For nickel plating, lower voltages are usually better, and lower amperages also help with smooth finishes. Thus, batteries at low voltage and low current are better than, say, an ATX 12V line. The anode, or positive terminal, of the plating bath was a nickel coin. It is important to note that the anode alligator clip should be above the water line or else it will be corroded away along with the nickel coin.
With the penny in the solution, I rotated it every thirty seconds to give it an even plating. After about a minute, I moved the battery pack alligator clip to a new position on the coin so that every area was plated. Once I had plated the coin for about three minutes, I washed it off and it was brilliantly shiny!
The coins didn't need any polishing at all, which I thought was really cool--my experiments with zinc plating were never this shiny. When compared with the blue-tinted zinc-plated coins I already had, the nickel-plated ones had a very beautiful golden-silver tint. I also plated steel with success by washing it in the acid and base and then repeating the plating procedure.
After I was done electroplating, I evaporated the nickel acetate plating solution by letting it sit uncovered for a month or so. This made some really nice chips of bright aqua nickel acetate crystals. I also made copper acetate by the same electrolysis method, and that evaporated down into very dark green kite-shaped crystals.
Phosphorus! The word brings to mind war, fire, and Thomas Edison. In all of these cases, phosphorus is memorable for its dangerous properties. Specifically, the allotrope white phosphorus autoignites in air and burns, spraying toxic droplets of white phosphorus everywhere. Its less-dangerous brother, red phosphorus, can be found in nearly every home.
I wanted some phosphorus for my element collection, so I chose red phosphorus over the extremely deadly white phosphorus. Red phosphorus (with crushed glass) is on the dark red striker pads on boxes of matches, so I collected 14 of these and cut off the striker pads. I placed these into acetone to dissolve the glue binding the red phosphorus to the cardboard. This went rather quickly, and after some stirring to dislodge any remaining red phosphorus, I removed each soggy strip of cardboard and washed it with more acetone. This helped catch any remaining red phosphorus and reduce losses. There isn't much red phosphorus on each strip to begin with, so careful handling is critical in this experiment.
After I had collected all the red phosphorus in the acetone, I let the mixture settle and then decanted off most of the acetone. I let the rest evaporate outside. To purify the red phosphorus from the annoying fibers of cardboard in the matted red cake, I poured in some concentrated sulfuric acid and heated the mixture outside on a hotplate. Needless to say, this step is dangerous and personal protective equipment is absolutely necessary. The hot sulfuric acid will release fumes as it chars the paper bits into carbon powder, so be mindful of that if you do this experiment yourself. Additionally, the mixture may "burp" a little, so a watch glass over the beaker might be helpful keeping the acid in the beaker.
Once I was satisfied that all the paper had been completely destroyed, I let the mix cool and placed the beaker in cold water. Then, I carefully added cold water to the beaker's contents, drop by drop, until I filled it to the top. This must be done slowly, as the dissolution of sulfuric acid into water releases a lot of heat. I let the mixture settle and decanted off the top portion of water. Then, I diluted and decanted the mix six more times so that no sulfuric acid remained in the beaker. Finally, I let the remaining water evaporate and then scraped the purified red phosphorus onto a sheet of paper.
To finish the experiment, I made another glass ampoule (Experiment 28: DIY scientific ampoules) and mushed the rounded base of the test tube into a flat bottom so the ampoule could stand upright. I then carefully tapped the red phosphorus powder into the amoule and sealed it with a torch (I first cleaned all residue off the neck of the ampoule). The resulting red powder is a pretty color and makes a very interesting sample for my collection.
After reading some interesting notes on another chemistry blog, I found out that there was solid tantalum metal inside tantalum capacitors. Apparently, tantalum is comparable in price to gold, but I wanted the tantalum for my element collection, not for scrap value. Intrigued, I rummaged through my mountainous stack of scrap circuit boards to find all their tantalum capacitors.
I found around thirty tantalum caps on different boards and broke them off. They are somewhat distinctive in appearance, but a Google search for "tantalum capacitor" also helped with identification. The tantalum capacitors I got can be seen in the picture on the right.
To extract the tantalum, I used a hammer to lightly tap on the larger capacitors and used pliers to crush the epoxy on the smaller ones. The tantalum inside is a somewhat-fragile sintered block, so don't go crazy wacking them, or they will break. Each tantalum block had a small tantalum wire attached to it, and this wire was attached to the capacitor SMD solder pad. I removed the solder pads from all the blocks I broke out of the epoxy and then placed the tantalum into a test tube for further cleaning. I added sand and water to the test tube and shook it vigorously to abrade off the manganese dioxide electrolyte on the surface of the tantalum.
Once the tantalum was clean and dry, I ended up with twenty-five miniscule black tantalum blocks with anodized tantalum wires protruding from them. I thought they were pretty neat, since they were quite heavy for their size, owing to tantalums density of ~16g/cc. The wire anodization colors were also interesting and ranged from blue to green. They weighed just about one gram total and made a really fascinating sample for my element collection. Who knew tantalum was in every computer?
In this experiment, I recrystallized garden sulfur (90% pure) to make pure sulfur crystals that gleam in the light and are a light yellow color. First, I acquired a solvent for sulfur. Since sulfur dissolves well in toluene, xylene, and carbon disulfide, I picked the most common option--xylene. My xylene came from paint thinner (it listed xylene as an component). To separate the xylene from the methanol and acetone also in the paint thinner, I mixed equal volumes of water and paint thinner and vigorously shook. This should be done outside, as the vapors are unhealthy. I poured the mixture into a graduated cylinder and let it settle for 15 minutes. The xylene, which is insoluble in water, floated at the top, while the acetone and methanol remained in the water layer. I syringed off the xylene and ended up with ~45mL from three 50mL batches of paint thinner.
Then, with my solvent collected, I began the recrystallization. I placed the xylene in a beaker with a stir bar and some impure sulfur and heated it on medium heat on my hotplate. I also had a beaker full of snow water resting on top of the xylene beaker to act as a crude condenser and recover xylene vapors. The whole experiment was done outside. The xylene shouldn't boil, or else vapors will go everywhere and escape the crude condenser setup in large quantities (unhealthy).
With the sulfur dissolving, I placed another beaker with a small amount of xylene (no sulfur) on the hotplate to warm. I also put a third clean beaker on the hotplate with a coffee filter on its top. Just as the xylene began to boil, I poured the prewarmed pure xylene through the filter in the third beaker. This warmed the filter and the beaker to prevent sulfur from crystallizing immediately on contact with the cold surfaces. Then, I filtered the dissolved sulfur mixture through the filter.
Once it finished filtering, I removed the filter and covered the beaker's mouth with tape to prevent losing xylene vapors. I then wrapped the hot beaker in towels to slow its cooling. This helped the crystals to grow more slowly, which makes bigger crystals. Once it cooled completely, I decanted off the xylene (which still had some dissolved sulfur in it) and scraped the sulfur crystals onto a coffee filter to dry. After the first batch was dry, I tried using them as seed crystals for a second and third batch of crystals, which seemed to make larger, prettier crystals. The resulting pure, shiny piles of sulfur crystals were quite beautiful.