Laser Cutter Build Night: Overcoming Barriers and Sizing up New Ones

Well, the "stuttering and jittering" mentioned last night became a huge problem.  The stepper not only lost steps, it plain got stuck and didn't go where I told it to.  Naughty, naughty!  However, upon the suggestion of a great friend of mine, I hosed everything down with a good coat of WD-40.  This XY table was, after all, an old CNC machine and was certainly exposed to dust and CNC debris.  After everything was coated in WD-40, both axes worked absolutely wonderfully!  It is such a relief knowing it all works!  I hypothesize that the Y axis became difficult to move because it was exposed to the dust and debris, while the X axis stayed nice and pristine because it was under the CNC table, out of harm's way.

With that barrier overcome, it is time to find some more (really, life?).  To oil everything with WD-40, I had to disassemble the sled that rode on the Y screw.  When I put it back together, it contracted some backlash issues.  Basically, when the motor reverses direction, the screw spins for a few tenths of a second before the sled actually begins to move in the new direction.  I don't know if this will be an issue, but in the world of trading old problems for new ones, I would say this is a pretty good trade - at least the stuff works!

I also dug into my stash of DVD writers to extract the writing laser tonight.  I tried once and didn't see what I thought was the right laser, so I wasn't as careful as I should have been and the laser diode got broken.  Then, I was more careful on my second attempt with a new DVD drive and got the laser out.  As it turns out, my laser is an open can diode rather than a closed can diode.  That is why I didn't recognize it.  Below are pictures of closed and open can diodes.
Mine is the same type as the one on the right (picture from http://goo.gl/W1HsOQ).  I am not sure if my new diode is damaged, as the tiny, delicate parts are exposed to handling, but I will try to make a driver circuit soon and get an Aixiz module to house, heatsink, and focus the laser.  I hope the diode will work, but it could be damaged or it could not work with the Aixiz.  Fingers crossed!

Conclusion for tonight: overcoming problems is not fun during the process, is rewarding in the end, and is a requisite part of any project.  Did I mention it wasn't fun?

Laser Cutter Build Night: It Moves!

Finally, at long last, I have some real results!  Before I get ahead of myself, though, I should say I used the EasyDriver schematic to adjust the current potentiometer on the EasyDriver until it was at about the max current (~750mA).  I have fairly large motors.  Having done this, I hooked up all the wires into their respective pins and turned on the Raspberry Pi (the networking issue seems resolved) and EasyDrivers.  Then, I tested the code.  It worked!  The steppers both moved!

However, one of them only moved one direction.  The other one worked fine, but this one caused problems.  It just wouldn't move both ways.  I tested for voltage coming from the Raspberry Pi, and there was none!  Aughh!  Did I break it?  After about a day of pounding my fists on the floor and boo-hooing, I figured it out.  The problem was not my Pi or the EasyDrivers - it was me (bleh).  As it turns out, I had written some bad code that didn't look in the right variable for where the DIRECTION pin was attached to the GPIO.  Thus, the Raspberry Pi never tried to output to the right pin.  Stupid me.  However, I am happy to say that both motors now move back and forth at a very nice rate!  The EasyDrivers seem to work fine and there has been no magic smoke, so I am very happy!  The Y axis motor, though, seems to jitter/stutter and not really want to move when stepping one direction at a low speed, so I am not sure if that will be a problem later.  However, everything appears to work generally well, so I say it was a successful night!

Laser Cutter Build Night: Raspberry Pi, Code, and Name

Tonight, I got the Raspberry Pi up and running, made some code, and christened my soon-to-be laser cutter!  The Raspberry Pi already had Raspbian installed, but I had to connect it to the WiFi using the Edimax adapter, and SSH didn't work even after the Raspberry Pi was connected.  I had to reboot the router to make this work, so I don't really know what the problem is.  I also coded up a small test program to output 3.3V on a GPIO pin every 0.005 seconds, so that should make the EasyDriver run the motor.  Additionally, I decided to name my laser cutter PiKnife - a play on the common pie knife used to cut real pies, only this one uses a laser.  Sorry this post is so short, but I've got work to do!

Laser Cutter Build Night: Final Stepper Wiring (Hopefully)

In tonight's progress, I did some extra wiring for the EasyDrivers.  As it turns out, a few online tutorials suggest tying all the GROUND pins together to synchronize the voltages or something like that.  To do this, I chopped up some female pin headers into individual pins that can connect to the three grounds on the EasyDriver.  These three grounds include the Raspberry Pi signal ground, the motor power supply ground, and the ground for an optional EasyDriver external power supply.  I used this blog post as a reference for what to do.
However, I noticed that the blog post says to connect the STEP and DIRECTION pins on the EasyDriver to ground by a 1K resistor.  None of the Arduino tutorials ever mention this.  Additionally, it is hard to know (due to annoying lack of Internet information) whether other people with working Raspberry Pi-EasyDriver combos used these resistors or not.  Thus, this could be the end of the wiring for the stepper motors or I could have to add some resistors.

Laser Cutter Build Night: Cables and Logic Voltage

In tonight's session, I built and connected up some cables for the motor-EasyDriver interface and for the EasyDriver-Raspberry Pi interface.  I found some really great 4-pin female connectors from the rear projection TV mentioned in the last build night's post and stripped these for the motor connections to the EasyDriver.  To identify which coil was which with the stepper motors, I spun it manually without any wires connected.  Then, I methodically shorted two of the motor's wires until I felt a great resistance while trying to turn the shaft.  These wires that make the motor harder to turn are one coil, and the other two are another coil.  I found some great info on the RepRap wiki, so check it out!  They say that polarity and order of coils don't matter on the 4-pin connector, as long as each coil's pair of wires are on their own end of the connector.  For example, on the connector, they might go like:

Coil_1A  Coil_1B  Coil_2A  Coil_2B

but the couldn't go like:

Coil_1A  Coil_2B Coil_2A  Coil_1B

because the leads for the coils aren't together.  If I wish to change the direction the stepper spins in, I can just flip the 4-pin connector 180°.  Below (right) is the finished motor connection layout:
On the left are the cables to go from the EasyDriver GND-STEP-DIRECTION header to the Raspberry Pi.  They are simple 3-pin connectors soldered to three solid-core breadboard-size wires for easy insertion into a breadboard.  They will ultimately be soldered to all the other necessary components. 

Lastly, I discovered that I need to set the EasyDrivers to accept 3.3V logic signals from the Raspberry Pi instead of their default, 5V.  To set this, I simply placed a dab of solder over the solder bridge SJ2 (bottom left on boards):
I would rate the build night "highly successful."  I am excited to finish the electronics tomorrow night as well as getting the Raspberry Pi up and running with code!

Laser Cutter Build Night: Power Supply

In this build night, I built the power supply that will power the two stepper motors driving the X and Y axes.  I lopped the connector off of an old wall-wart for a dismantled CD player (taken apart in my quest for stepper motor CD drives for a mini laser cutter) and stripped the wires.  I then checked the polarity and connected the wires to a Y splitter made by cutting a 2-pin female-female pin cable in half (cable from rear projection TV disassembled for a Fresnel lens).  Each end of the Y splitter will connect to the motor power header for one EasyDriver board.
The wall-wart power supply is 12 volts at 3 amps.  I read that stepper motors should be run at a couple times their labelled voltage, and since I have a similarly sized stepper motor listed at 3.36V, I thought 12V would work fine.  Each EasyDriver can do a maximum of 750mA, so the 3A from the power supply should be quite ample!  I don't know if the thinner wires will handle this current or if the steppers will even run with 750mA or if the 12V will be good or bad for the motors, so I have my fingers crossed on multiple aspects of tonight's activities! Wish me luck and use the contact page if you have hints, advice, or suggestions!

Laser Cutter Build Night: In The Beginning...

This post finally signifies the commencement of my laser cutter project!  I have talked about building one for a while (and never started), but through a convergence of delightful events, I now have actual parts and can build!  Most of starting components were given to me through connections at FIRST Robotics, so I highly recommend all you high-schoolers join a team.  It's a great experience!

With that said, here are the parts that got this thing started!

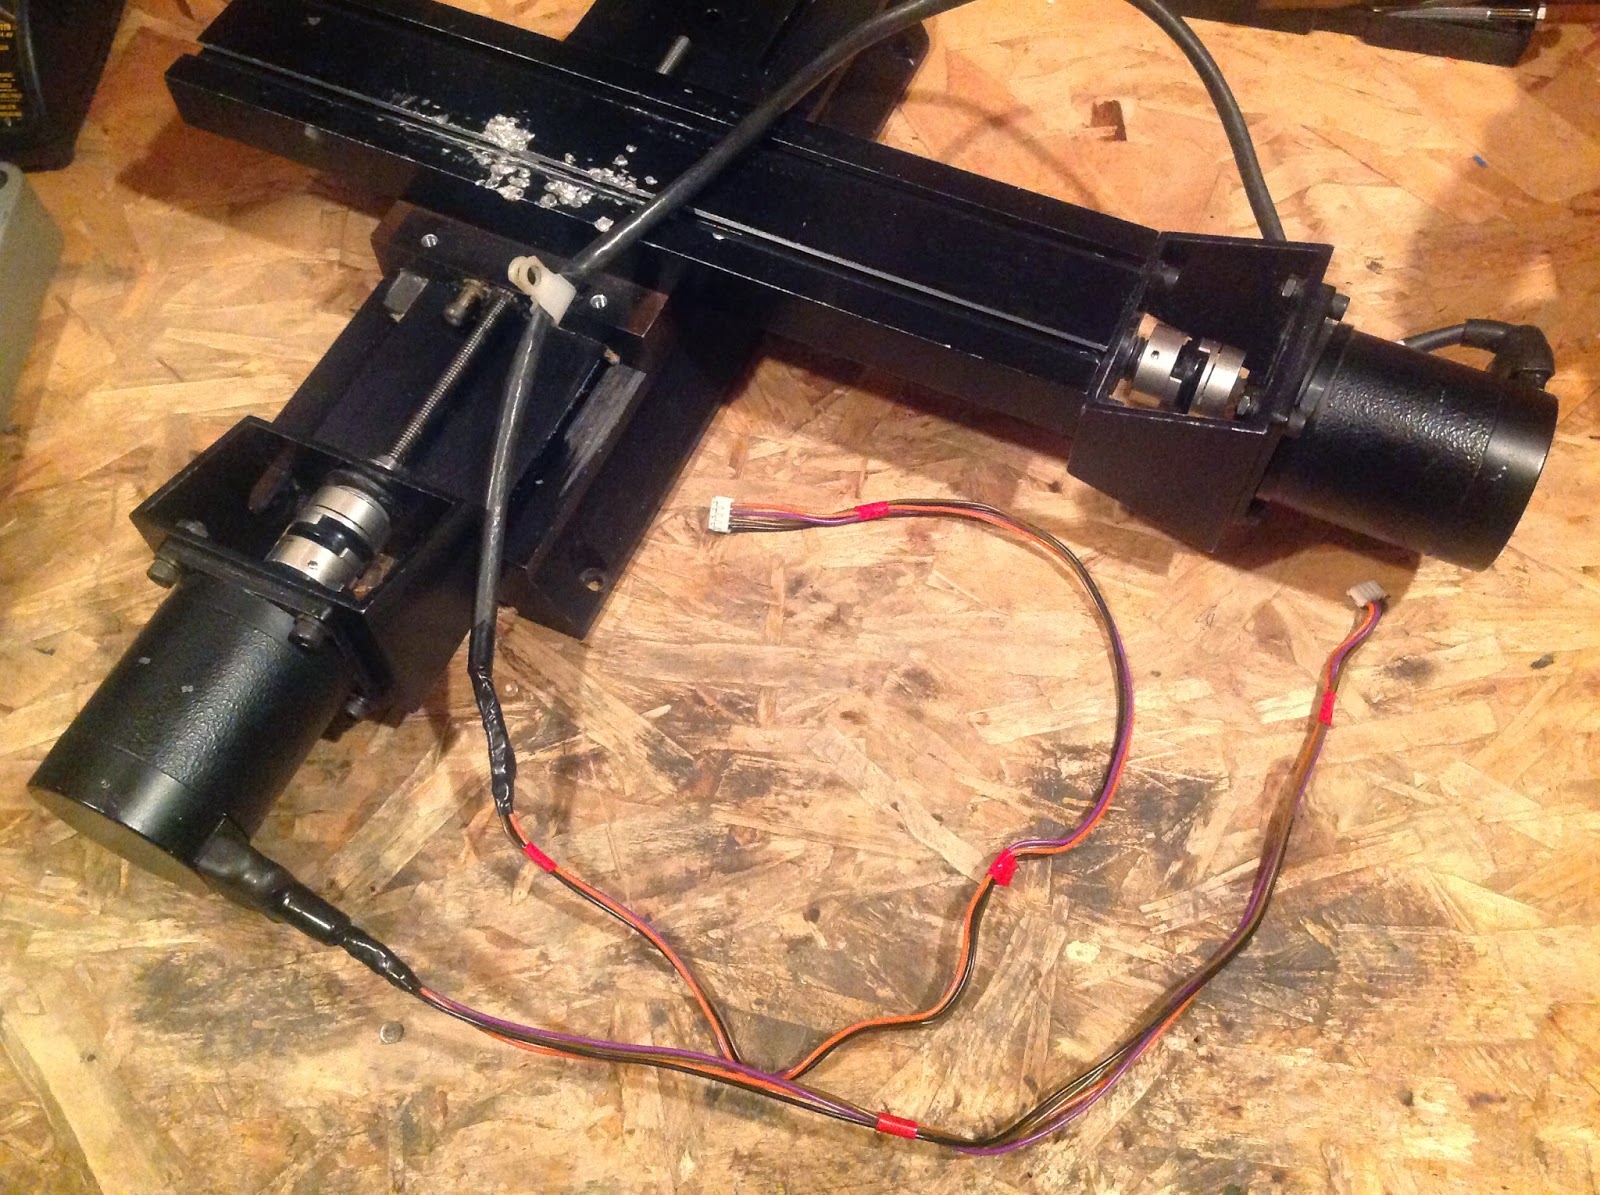
This is the barebones XY table from an old CNC machine with an outdated control system.  Without the control system, it is useless, so my robotics team took a few apart and I walked out with this!  It has two giant 4-wire stepper motors, threaded rod drive, and a very hefty construction.  It weighs a lot, so it won't be tipping over any time soon!  In tonnight's build session I stripped it of unnecessary junk and wiped off some accumulated grease.

These are a part of the control electronics I will be using.  They are EasyDriver stepper motor controllers, graciously given to me by a friend on my robotics team.  They came without the male pin headers attached, so I had to solder them on.  I was a little bit unsure of myself since it was my first time soldering to a PCB, but they turned out fine!  I will be using these in conjunction with a Raspberry Pi I have & a free flatscreen monitor off Craigslist to make a fully operational laser cutting workstation.


I also salvaged a few limit switches from the decrepit CNC machine to be used for homing the XY table.  To summarize the build night, I assembled my inventory of main components, cleaned up the XY table, and built the EasyDrivers.

Experiment 25: Real Gold!

A month or so ago, I was given the opportunity to raid a pile of to-be-discarded computer parts.  I went to it vigorously!  I built a computer with some parts, FINALLY got DVD drives with stepper motors for my laser cutter, and stole every single stick of RAM in the pile.  Why did I commit this heinous act of villany?  Gold!  (Also, the parts were being thrown out, so without my intervention, all the parts would have gone to some recycling corporation.  Not techy, DIY or scientific.)  On every stick of RAM, there is a little bit of gold in the contacts.  Gold is necessary for this application instead of copper because copper oxidizes and tarnishes in air, creating a layer of unconductive compounds.  This will severly hamper the job of an electrical contact.  To recover the gold, I used sheet metal benders to break off all of the contacts while taking nothing else.  Then, I put them in a bath of copper etchant to remove the copper backing on the gold.  I used NurdRage's 10:1 ratio of 3% hydrogen peroxide to 96% sulfuric acid.
 After 24 hours, I removed the solution through filtration and rinsed off all the gold flakes plastered to the contact strips.  The strips still had a lot of gold on them, though, so I put them in a second round of etchant.  After another 24 hours, I had removed all the gold, so I washed it and filtered it out of the spend solution, which was neutralized with baking soda until it stopped fizzing.  I heated the wet gold to remove all the water sticking it together and then weighed it.  Since I currently don't have access to a scale with a precision of over 1g, the gold weighed in at 0g.  Sad, but I still have some cool gold.  I am amazed day by day by its shininess and amazing golden color, so I would consider this experiment a "golden" success.

Experiment 24: Gallium & Coins

A while ago, I carved a template pirate booty coin from some thin plywood using my woodcarving knife.  Recently, I got gallium metal (wahoo!), so I decided to make a mold for the wooden template.  I used plaster of paris and just poured it over the coin in a cardboard tube.  After it had dried, I pried the wood coin out.  It broke the mold a bit, so I had to do surgery with epoxy and superglue.  Then, I melted the gallium in a double-boiler setup over my hotplate.  I have found that the gallium tends to get a layer of slag on top if it is submerged in water.  The gallium cast very easily when molten and stayed molten... and stayed... and stayed.  Turns out, gallium has a (very strong) tendency to supercool, which means that the liquid will cool to below its melting point of 85°F and still be liquid.  This property can be great, but it is very annoying if your gallium coin never freezes.  To remedy the problem, I added a crystal of solid gallium.  This seed crystal jumpstarted the freezing process and in a reasonable amount of time, the gallium froze.  When tried to remove it from the clutches (notice foreshadowing) of the mold, the mold flatly refused to let go.  In the end, the mold broke completely and the gallium pirate booty coin turned out great!  I am very pleased with how the design turned out.  Sadly, the coin met its end in a hot car on a sunny summer day (it was "experimentation"), but I plan to resurrect the pirate booty coins by making a new mold and being more careful.


Experiment 23: Fashion and Printer Ink

No, this is not about spilling ink on a dress.  However, in my search for stepper motors for a laser cutter, I found some great printers on craigslist.org that DIDN'T include stepper motors.  Arghh.....  I removed the ink cartridge from one printer carcass and wanted to see what was inside, so I pried it apart.  The module came undone fairly easily.  Inside, there were fiber pads soaked in red, yellow, and blue ink (I don't remember if there was a black pad).  When I took one out and soaked it in warm water, the ink came out to make a really nice dye bath.  I combined some colors in varying proportions to make different colors.  I then cut strips from a sock and placed one in a lime green dye bath and one in a purple bath.  I boiled and agitated the lime green bath with my magnetic stirrer hotplate and left the purple bath to sit for an equal amount of time.  Then, I removed both and set them to dry.  The result was a pair of "interesting" armband/bracelet things.  Maybe they could be dyed to make a color-coordinated set of armbands?  Perhaps one could make patterns?
However, since I won't be wearing them much, I subjected them to more experimentation.  I used scalding hot water and laundry detergent to wash them by hand.  As it turns out, the agitated and heated armband (lime greed) held its color better than the purple, although both faded
considerably.  Don't wear them in the rain!